Python Program to Make a Simple Calculator
Python Program to Make a Simple Calculator using Tkinter library


How to create a calculator in python?
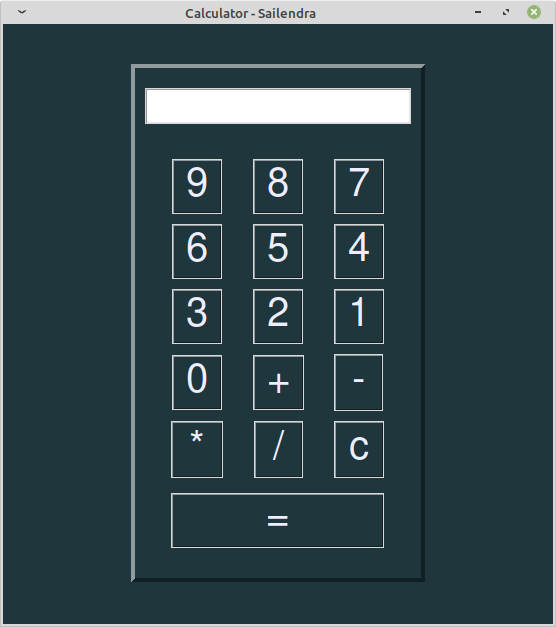
Do you wanna create a calculator using python? You are in right place. This post will guide you on how you can create a simple and working calculator using python and the Tkinter library for GUI.
Let's write starter code and import Tkinter library
from tkinter import *
from tkinter.messagebox import showerror

root = Tk()
root.title('Calculator - Yourname')
root.geometry('550x600')
root.configure(bg="#1F363D")

# Body of the program

root.mainloop()
Create a function to get value from the user
#Function to write logic
def button_click(num):
    global current_equation
    current_equation = str(value_entry.get())
    value_entry.delete(0, END)
    value_entry.insert(0, str(current_equation) + str(num))
Create another function for clearing the screen, whenever the user clicks on the
Cbutton it clears the screen.
#Clear screen function
def clr():
    value_entry.delete(0, END)
Create an equal function that calculates equation and display it on the screen
#Let's create equal function that calculate equation and display
def eql():
    try:
        ans = eval(value_entry.get())
        value_entry.delete(0, END)
        value_entry.insert(0, ans)
    except:
        showerror("Value Input Error", "Check your input and try again!! ")
        value_entry.delete(0, END)
Create three frames for entry widgets, body content, and another frame to assemble the previous two frame
#Create three frames for the entry widgets, the body's buttons and for main body
frame_main = Frame(root, bg="#1F363D", bd=4, relief=RAISED, pady=10, padx=10)
frame_main.pack(pady=(40, 0))

frame_entry = Frame(frame_main)
frame_entry.pack(pady=10)

frame_body = Frame(frame_main, bg="#1F363D", pady=10, padx=10)
frame_body.pack(pady=10)
Create an Entry widget for displaying equation and the result as well
#Create Entry widget
global value_entry
value_entry = Entry(frame_entry, font=("Times New Roman", "20","bold"), width=20, fg="#1F363D", justify=CENTER)
value_entry.pack()
Create all buttons from 9 to 0 and other arithmetic symbols. You can enhance this button by using loops. But the below are the easy way to create, which is beginner-friendly as well
# Create buttons
button_9 = Button(frame_body, text="9", font="Helvetica 30", fg="#EEEEFF", bg="#1F363D",  command = lambda: button_click(9))
button_9.grid(row=0, column=0,pady=5, padx=15)

button_8 = Button(frame_body, text="8", font="Helvetica 30", fg="#EEEEFF", bg="#1F363D",  command = lambda: button_click(8))
button_8.grid(row=0, column=1,pady=5, padx=15)

button_7 = Button(frame_body, text="7", font="Helvetica 30", fg="#EEEEFF", bg="#1F363D",  command = lambda: button_click(7))
button_7.grid(row=0, column=2,pady=5, padx=15)

button_6 = Button(frame_body, text="6", font="Helvetica 30", fg="#EEEEFF", bg="#1F363D", command = lambda: button_click(6))
button_6.grid(row=1, column=0,pady=5, padx=15)

button_5 = Button(frame_body, text="5", font="Helvetica 30", fg="#EEEEFF", bg="#1F363D", command = lambda: button_click(5))
button_5.grid(row=1, column=1,pady=5, padx=15)

button_4 = Button(frame_body, text="4", font="Helvetica 30", fg="#EEEEFF", bg="#1F363D", command = lambda: button_click(4))
button_4.grid(row=1, column=2,pady=5, padx=15)

button_3 = Button(frame_body, text="3", font="Helvetica 30", fg="#EEEEFF", bg="#1F363D", command = lambda: button_click(3))
button_3.grid(row=2, column=0,pady=5, padx=15)

button_2 = Button(frame_body, text="2", font="Helvetica 30", fg="#EEEEFF", bg="#1F363D", command = lambda: button_click(2))
button_2.grid(row=2, column=1,pady=5, padx=15)

button_1 = Button(frame_body, text="1", font="Helvetica 30", fg="#EEEEFF", bg="#1F363D", command = lambda: button_click(1))
button_1.grid(row=2, column=2,pady=5, padx=15)

button_0 = Button(frame_body, text="0", font="Helvetica 30", fg="#EEEEFF", bg="#1F363D", command =  lambda: button_click(0))
button_0.grid(row=3, column=0,pady=5, padx=15)

button_add = Button(frame_body, text="+", font="Helvetica 30", fg="#EEEEFF", bg="#1F363D", command = lambda: button_click('+'))
button_add.grid(row=3, column=1,pady=5, padx=15)

button_sub = Button(frame_body, text="-", font="Helvetica 30", fg="#EEEEFF", bg="#1F363D", pady=5, padx=15, command = lambda: button_click('-'))
button_sub.grid(row=3, column=2,pady=5, padx=15)

button_mul = Button(frame_body, text="*", font="Helvetica 30", fg="#EEEEFF", bg="#1F363D", pady=5, padx=15, command = lambda: button_click('*'))
button_mul.grid(row=4, column=0,pady=5, padx=15)

button_div = Button(frame_body, text="/", font="Helvetica 30", fg="#EEEEFF", bg="#1F363D", pady=5, padx=16, command = lambda: button_click('/'))
button_div.grid(row=4, column=1,pady=5, padx=15)

button_clear = Button(frame_body, text="c", font="Helvetica 30", fg="#EEEEFF", bg="#1F363D", pady=5, padx=12, command = clr)
button_clear.grid(row=4, column=2,pady=5, padx=15)

button_equal = Button(frame_body, text="=", font="Helvetica 30", fg="#EEEEFF", bg="#1F363D", command = eql)
button_equal.grid(row=5, column=0, columnspan=3, ipadx=81, pady=(10, 0))
DONE !!
If you found any mistakes or found them helpful for you then let me know, I will be happy to know your feedback.
Reach out to me at TWITTER